Adding a custom font family to a React Native project can significantly enhance the user interface and improve the overall user experience of your mobile application. Whether you’re aiming to match your brand’s style or just want to experiment with different typography, custom fonts can make a big difference. In this blog post, we’ll walk through the steps needed to add a custom font family in React Native, covering both iOS and Android platforms.
Prerequisites
- A React Native project set up using React Native CLI.
- Basic knowledge of React Native and mobile development.
- Access to custom font files (usually
.ttfor.otfformat).
Step 1: Download Your Font
First, you need to download the font files you wish to use. Make sure the fonts are in .ttf (TrueType Font) or .otf (OpenType Font) format, as these are commonly supported by both iOS and Android.
Step 2: Create a Fonts Folder
Within your React Native project directory, create a folder named assets in the root directory if it doesn’t already exist. Inside the assets folder, create another folder named fonts and place fonts there. The directory structure should look like this:
/your-project
  /android
  /ios
  /src/assets
       /fonts
         your-custom-font.ttf
Step 4: Link Fonts in Your Project
In older versions of React Native, fonts needed to be linked manually. However, with the latest versions, this process has been simplified.
Automatic Linking (React Native 0.60 and above)
React Native version 0.60 and above supports autolinking, which means you simply need to add the font to your react-native.config.js file, and it will automatically link them for you.
Create or update the react-native.config.js file in the root of your project to include the following:
module.exports = {
  assets: ['./assets/fonts'],
};
After saving the file, run the following command to link the fonts:
npx react-native-assetManual Linking (React Native below 0.60)
If you’re using a version below 0.60, you’ll need to manually link the fonts.
- For iOS:
- Open the
.xcodeprojor.xcworkspacefile in Xcode. - Go to Project > Targets > Build Phases and add fonts in Copy Bundle Resources by clicking on + and Add other
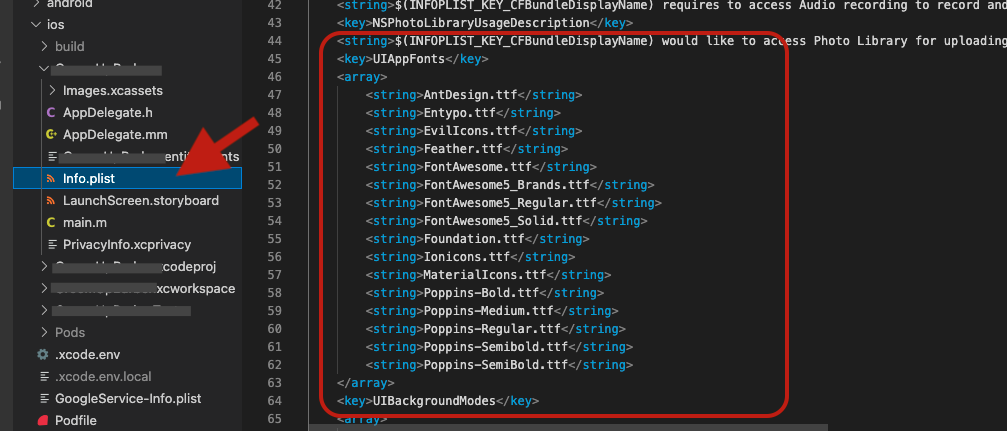
- Then, in Xcode, go to your project’s
Info.plistfile and add a new array entry namedFonts provided by application. Add each font file as a new item in this array.
- Open the

- For Android:
- Open the
android/app/src/main/assets/directory (createassetsdirectory if it does not exist). - Copy the
fontsfolder into this directory. - Modify
android/app/build.gradleto include the fonts:
- Open the
apply from: "../../node_modules/react-native-vector-icons/fonts.gradle"

Step 5: Use the Custom Font in Your Styles
Now that the font is linked to your project, you can use it in your styles.
For example, in a Text component:
import React from 'react';
import { Text, View, StyleSheet } from 'react-native';

const App = () => {
  return (
    <View style={styles.container}>
      <Text style={styles.customFontText}>Hello, Custom Font!</Text>
    </View>
  );
};

const styles = StyleSheet.create({
  container: {
    flex: 1,
    justifyContent: 'center',
    alignItems: 'center',
  },
  customFontText: {
    fontFamily: 'YourCustomFont',  // Use the exact font name as specified in the font file.
    fontSize: 24,
  },
});

export default App;
Troubleshooting
- Fonts not displaying correctly: Ensure the font name used in the
fontFamilystyle matches exactly with the font file name (excluding the file extension). - Xcode not loading fonts: Sometimes, Xcode caches might cause fonts not to load properly. Try cleaning the build folder (
Product > Clean Build FolderorCmd+Shift+K) and rebuilding the project.
Conclusion
Adding custom fonts in React Native is a straightforward process that can significantly enhance your app’s look and feel. With React Native’s autolinking, the process is even simpler. Whether you’re designing for Android, iOS, or both, the steps outlined in this blog post should help you seamlessly integrate custom fonts into your mobile applications.